The Uploaded File Could Not Be Moved to Wp-content/uploads/2018/02.
The WordPress Media Library makes it piece of cake to manage and share all types of files from images and videos to sound and PDF files. But max file size limits and server timeout errors make it hard to add together large files to the WordPress Media Library.
If you are getting an mistake when trying to upload a big file there are several ways to increase the adequacy of the media uploader. In this post, we volition show you three methods for adding big files to your media library.
- Increase the limit set by your hosting provider
- Use FTP and utilise the Add together From Server plugin
- Utilise the Big File Uploads plugin
The media library is great for managing files and a smart way to go along all your files in order. If your hosting company has strict guidelines on server resources or you don't have admission to the server, this tutorial will give you lot options for uploading big files.
How to Find The Maximum File Upload Size in WordPress
Before you lot brainstorm, a adept thing to check is the maximum file upload size that your website volition let. To exercise so, navigate to the Media Library equally if you lot were going to upload a file. Click Add New and you'll encounter a notice of what the maximum file upload size is. In this case, information technology's 128 MB.
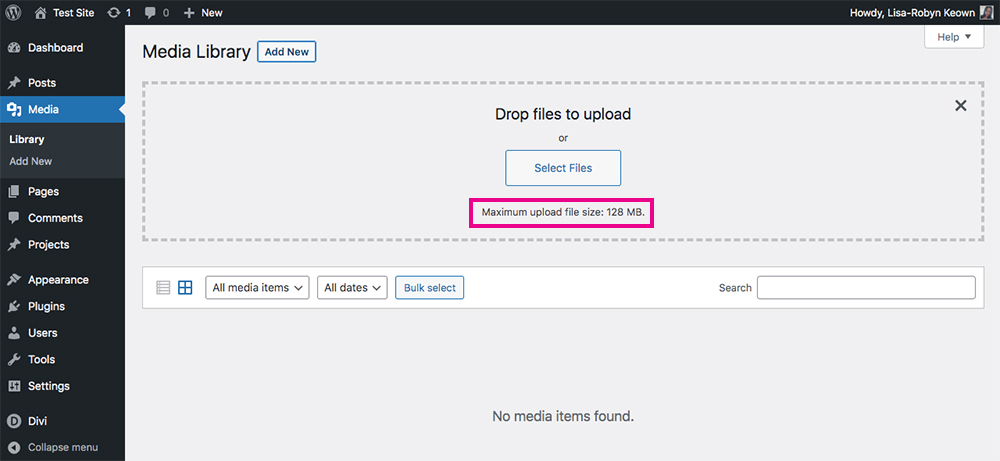
Check to see what the maximum file upload limit is
Upload Large Files to WordPress Using FTP
The first method nosotros'll unpack uses FTP. FTP (File Transfer Protocol) creates a direct link to your estimator and a server, allowing you to move files between them. Two pop FTP clients be, they are FileZilla and CyberDuck. Both of these programs are complimentary to download.
Once yous've got an FTP client up and ready to get, you can admission the website's server. For this, you'll need server details similar the host, username, password and port.
If you practice not have server access or are looking to expand the upload limit for a client, jump to the Big File Uploads method.
Pace 1: Connect to the Website via FTP and Upload the Media File
Once you have continued to the web server via FTP, you will want to navigate to the WordPress site'south Uploads folder. Typically, the Uploads folder resides under wp-content >>uploads>>twelvemonth>>calendar month and the path volition look something like this: /yourwebsite/wp-content/uploads/2021/07.
Depending on what month you would like the media file to be nested under, select based on your needs. Typically this will be the about current calendar month, but you may have the need to organize in a past folder.
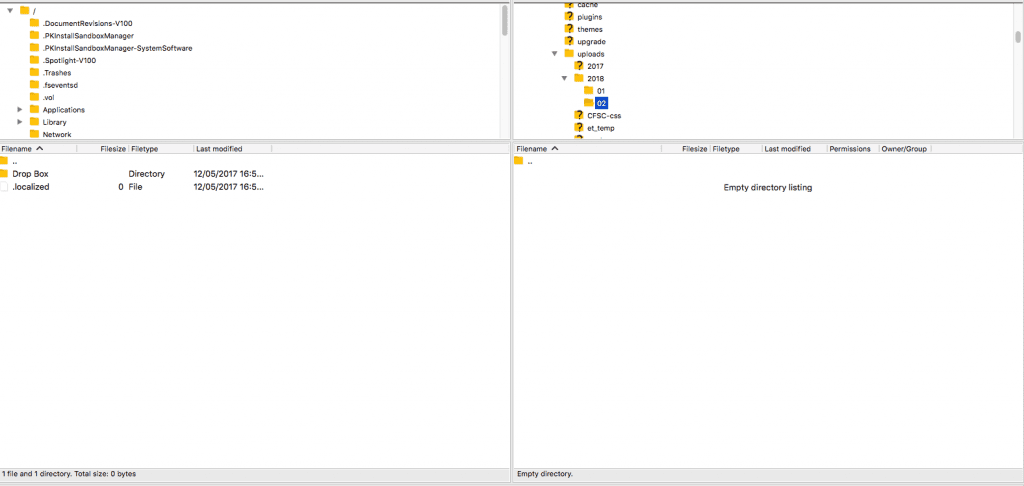
Search for the Uploads folder and navigate to the respective calendar month
Now that y'all take accessed the site via FTP and located the desired Uploads binder, information technology is time to add your media. The file that I am going to upload is a ix.2MB image from unsplash.com.
Under normal circumstances, you definitely would' upload an paradigm of this size to your website. You'd ingather it, compress it and format it for web to brand sure that the image file size is as small every bit possible, but for this tutorial, the goal is to upload large files to the Media Library.
To add the paradigm, make sure that the proper Uploads folder is selected then simply drag and drop the file onto the FTP client. In this case, using FileZilla, I dropped the folder where it says "Empty directory listing" in the prototype above.
Now that the file is added you will see information technology in the uploads folder on your server.

The large file has been added to the server
Stride 2: Install the "Add From Server" Plugin
With Footstep 1 complete, the desired media file resides on the server and is in the proper uploads directory. This all seems expert and well, but in that location's a trouble, that the media file won't appear in the WordPress Media Library by default unless it is added using the native media uploader. In this case, since we were unable to add the file using the normal method, we accept to take more steps for information technology to announced in the Media Library.
As you tin meet in the epitome below, I practice accept some goodies in my Media Library, but the image I added via FTP of a starry night and some mountains is missing even though information technology is in the proper uploads folder on the server.
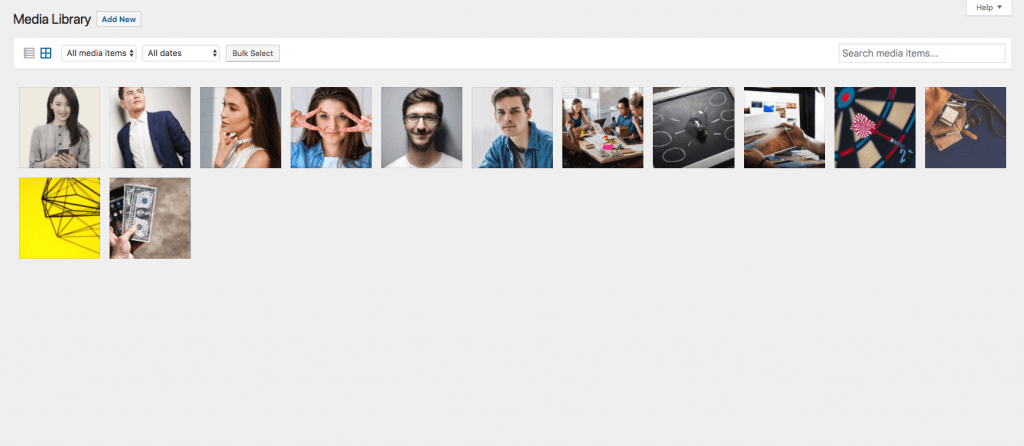
Despite calculation the image to the server, information technology is not displaying in the Media Library
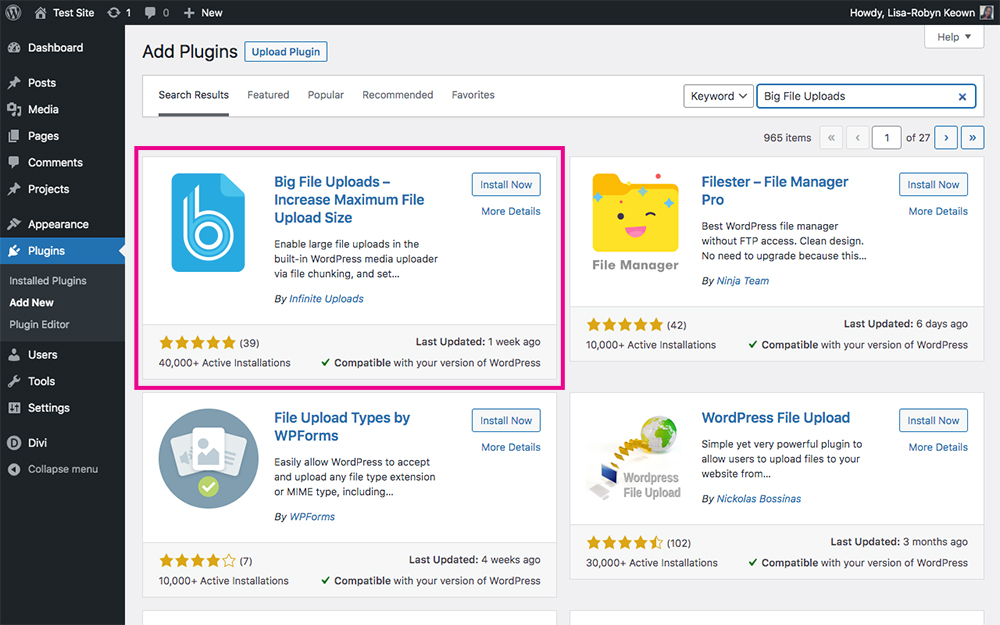
In order to add this file to the Media Library, install the Add From Server plugin either directly from the WordPress plugin dashboard or by downloading it from the WordPress repository. Once it is installed, recollect to Activate the plugin.
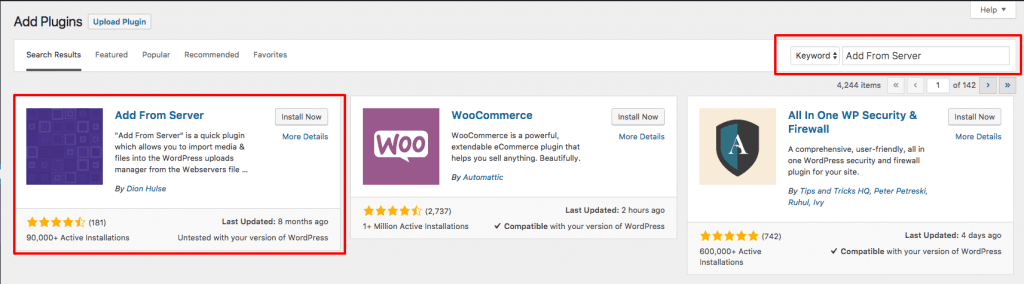
Search for the Add From Server WordPress plugin
Step 3: Import the Media File into Your WordPress Library
With the Add From Server plugin installed and activated, you will see a new option nether the Media Menu called Add From Server. Click on Add From Server and y'all volition exist brought to a screen with several website directories to choose from. In this case, we are going to click on the "Uploads/" directory.
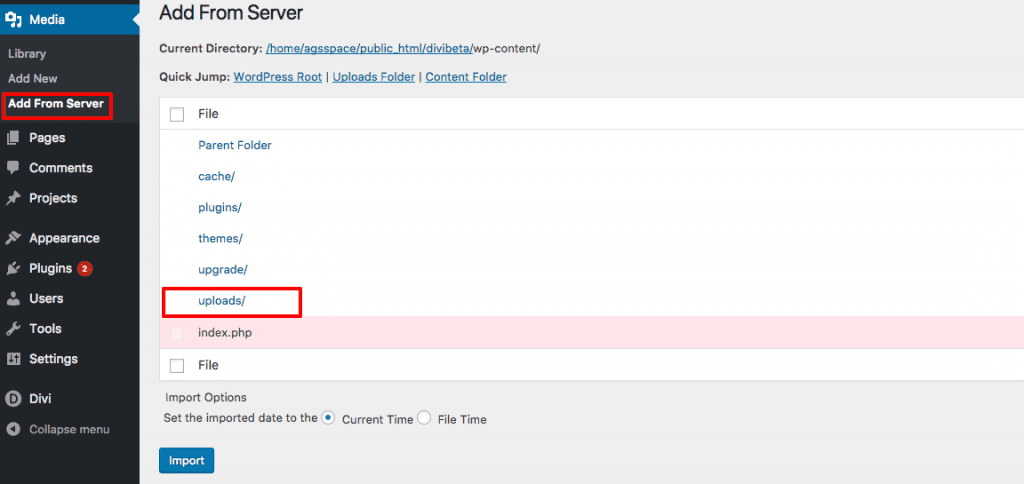
Select the Uploads binder
After you lot click on uploads/ you will then select the year of the folder and then the month that y'all uploaded to. One time yous are in the proper location, you lot should come across the media file that you uploaded via FTP. Select the particular and then click "Import".
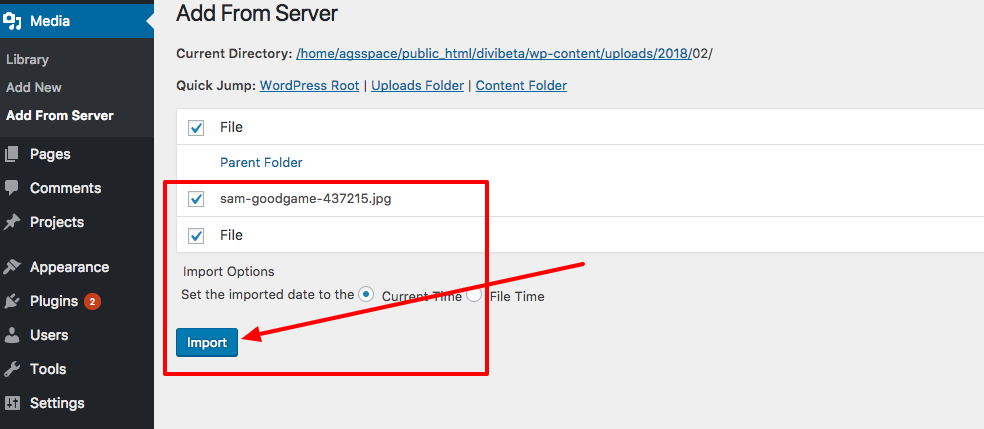
Click Import
Blast, only like that the file is now located in your Media Library and can be used throughout the site in pages, posts, modules, products and more.
Upload Large Files to WordPress By Editing the .htaccess File
Another option for hacking the organisation is to edit the .htaccess file. The .htaccess file acts equally a sort of master file in the WordPress cadre packet. Editing its variables can have tremendous effects on your site, and so when doing so, make certain y'all fill-in the file first.
Information technology's important to mention that, because the .htaccess file is such an important one, some hosts may restrict the editing thereof. If you cannot access this file, contact the hosting company directly for assistance.
This method too requires server access. You tin can either log into the server directly or access it via FTP. In one case you lot've accessed the server, locate the site files of the WordPress core package. Within these files, locate the .htaccess file and open information technology. Once you're inside, add together the following lines of code:
php_value upload_max_filesize 64M php_value post_max_size 64M php_value max_execution_time 300 php_value max_input_time 300
Upload Large Files to WordPress By Editing the php.ini File
Some other method for irresolute the file upload size to allow for large uploads is to edit the php.ini file. Again, you'll need server access either directly through the server itself or via FTP. Similar to the .htaccess method, altering the php.ini file may not be allowed by some hosts.
Once you've located the file, add the following code:
upload_max_filesize = 64M post_max_size = 64M max_execution_time = 300
Upload Large Files to WordPress Using the Big File Uploads Plugin
All of the methods mentioned to a higher place require server access, and in some cases, you may not be able to edit the files on the server at all. So what exercise you practice if y'all don't accept access or experience a timeout error? In this instance, you lot could use a plugin such as Big File Uploads.
Available as a free download from the WordPress repository, Big File Uploads from Infinite Uploads helps you bypass the upload limits ready by your host, letting you increase the maximum upload size to as large as your bachelor disk infinite allows. With an increased upload size, you lot can add large media files to your Media Library and carry on edifice your website.
The plugin works by enabling multipart uploads. Instead of uploading a single file at a time, a big file will exist uploaded in segments or chunks. Once all of the small pieces of the file are uploaded, the plugin volition combine them together once again earlier they reside in the Media Library. By uploading files in segments, or chunks, with Big File Uploads, you won't experience any timeout errors or hassles. This is major, as using other methods like changing the php.ini file may cause issues in this regard.
At the time of writing, Big File Uploads has over 40,000+ active installations and is updated often.
To begin, caput over to the WordPress Plugins dashboard and search for Big Uploads. Alternatively, download the plugin from the WordPress repository and upload it to your site.
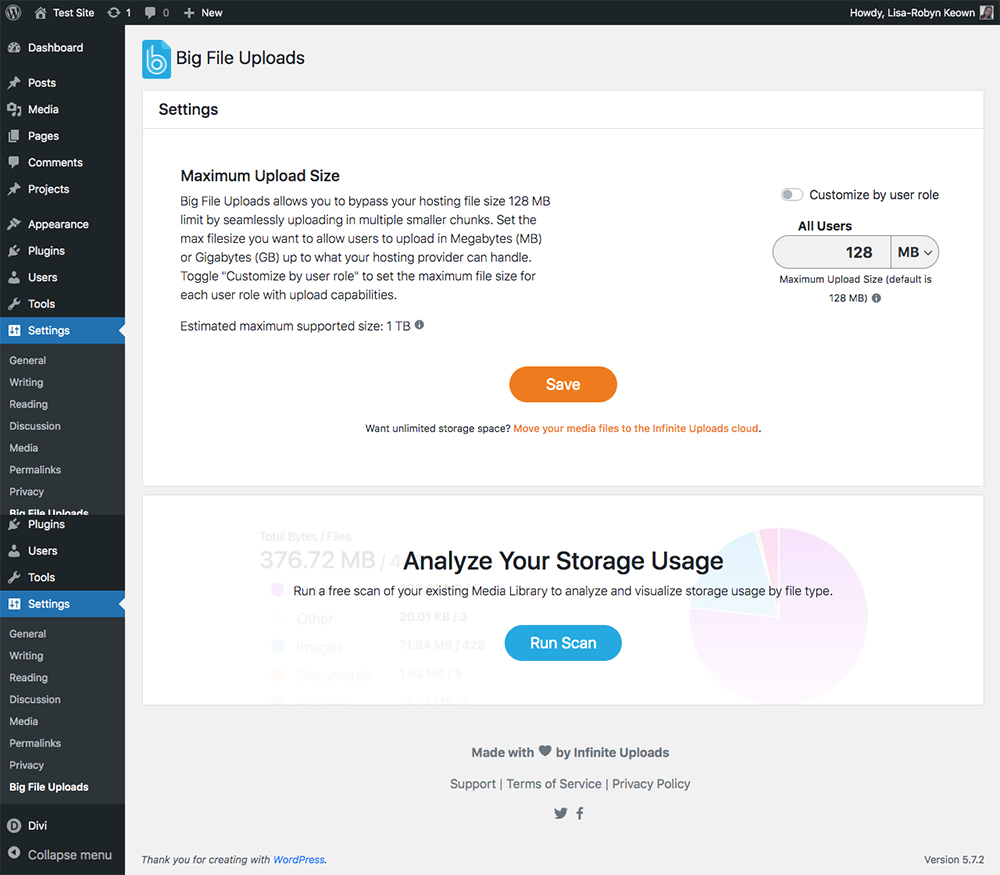
Once the plugin has been installed and activated, it'll create a new bill of fare item in the Settings menu. All of the plugin'due south settings can be configured from this unmarried console.
Changing the file upload size
Kickoff, the plugin will automatically observe the site'southward default file upload size every bit defined by the host. To change this, accommodate the number counter and select whether you lot'd like the limit to be set in either GB or MB.

The plugin also offers a rough guideline of the maximum size y'all tin set. This value is estimated based on the remaining space in the server'southward temp directory. You can increase this value past offloading to a paid storage service from Space Uploads. More than on this later.
Setting custom upload size limits for each User
Some other swell attribute about Big File Uploads is that it allows you to set a custom file upload size for each user role on the site. If yous accept multiple people working on your site, for case, editors and authors who are running a blog, by limiting their file upload size, y'all can rest assured knowing they won't be able to upload big files, like images that are 9MB each.
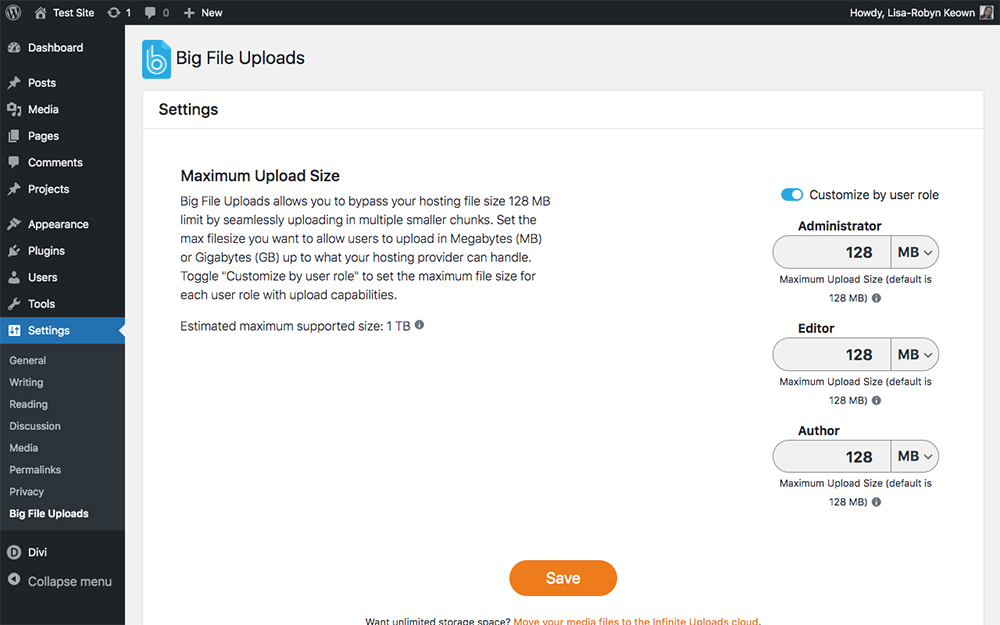
Adjacent to the "Customize by user role" find is a toggle, and when toggled on, you'll see a list of the available user roles pop up, each with its own file upload size counter. Hither, you can ready a custom size for each part.
Storage usage browse
An crawly feature included in the plugin is the storage usage browse.
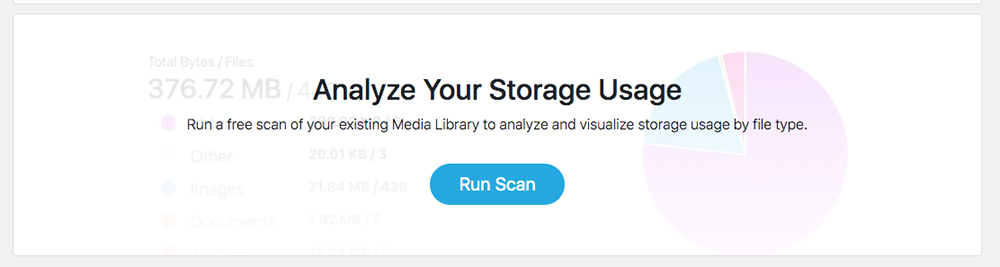
At any indicate, yous tin can browse your Media Library and get insight into how much storage space yous take left. If you come across that you're running low, you could purchase cloud storage from Infinite Uploads.
Big File Uploads Drawback
Large File Uploads has a few limitations. This will not piece of work to increase the upload limit of files beingness uploaded from the front end end of your website because these tools do not employ the same upload method as the WordPress media library. If yous are using a plugin or extension to permit users to upload from the front of your website you will need to consider a different method.
The simply other drawback is large files use a lot of infinite and resources. If you lot are non storing your media files in the cloud, big files can slow downwards your servers and affect site functioning.
Unlimited storage from Infinite Uploads
If you desire to move your Media Library's files totally offsite, you lot tin can buy a membership from Space Uploads and use their deject storage service. Moving all of your images, videos, audio files and so on abroad from the Media Library will relieve bandwidth and will go along your website running fast. Also, y'all'll never be restricted past file limits as gear up by your host.
Using Infinite Uploads' storage service, you'll get access to a cloud-based storage organization for your media files. Fifty-fifty though your content is stored in the cloud, you won't take to worry about using FTP or gaining server access, equally you lot'll exist able to use the WordPress Media Library as per normal. Your prototype, video, sound and PDF files will still display as if they were in the Media Library, nonetheless they're actually offsite, in the cloud. Files are transferred to and from the cloud using encrypted SSL and other high-end security solutions, pregnant your content is safe and secure at all times.
Unlike almost services that make you lot pay per plugin or per site, with Infinite Uploads, you only pay for your storage. Plans are really affordable too, beginning as low as $9 per calendar month for 20GB of storage and 20GB of CDN delivery. The Infinite Uploads CDN has over l data centers, making sure your content is served to your customers at lightning speed.
If yous need to brand your site infinitely scalable you should check out Infinite Uploads. Space Uploads offers a vii-24-hour interval costless trial to all new users so you can effort it risk-free. Sign up for a gratuitous trial.
Ending Thoughts
Spider web designers and developers are faced with all kinds of different scenarios and obstacles on a daily basis. The dazzler of working with a dynamic CMS like WordPress is that there are many tricks and tools available.
If you demand to upload large files to your WordPress Media Library, there are many methods bachelor to you, some using more technical methods, others using nifty plugins such as Big File Uploads and boosted storage from Infinite Uploads.
If y'all take whatsoever questions or comments, delight feel gratuitous to leave them beneath. We love receiving your feedback! Thanks for reading!
Source: https://aspengrovestudios.com/how-to-add-large-files-to-your-wordpress-media-library-via-ftp/
0 Response to "The Uploaded File Could Not Be Moved to Wp-content/uploads/2018/02."
Postar um comentário